
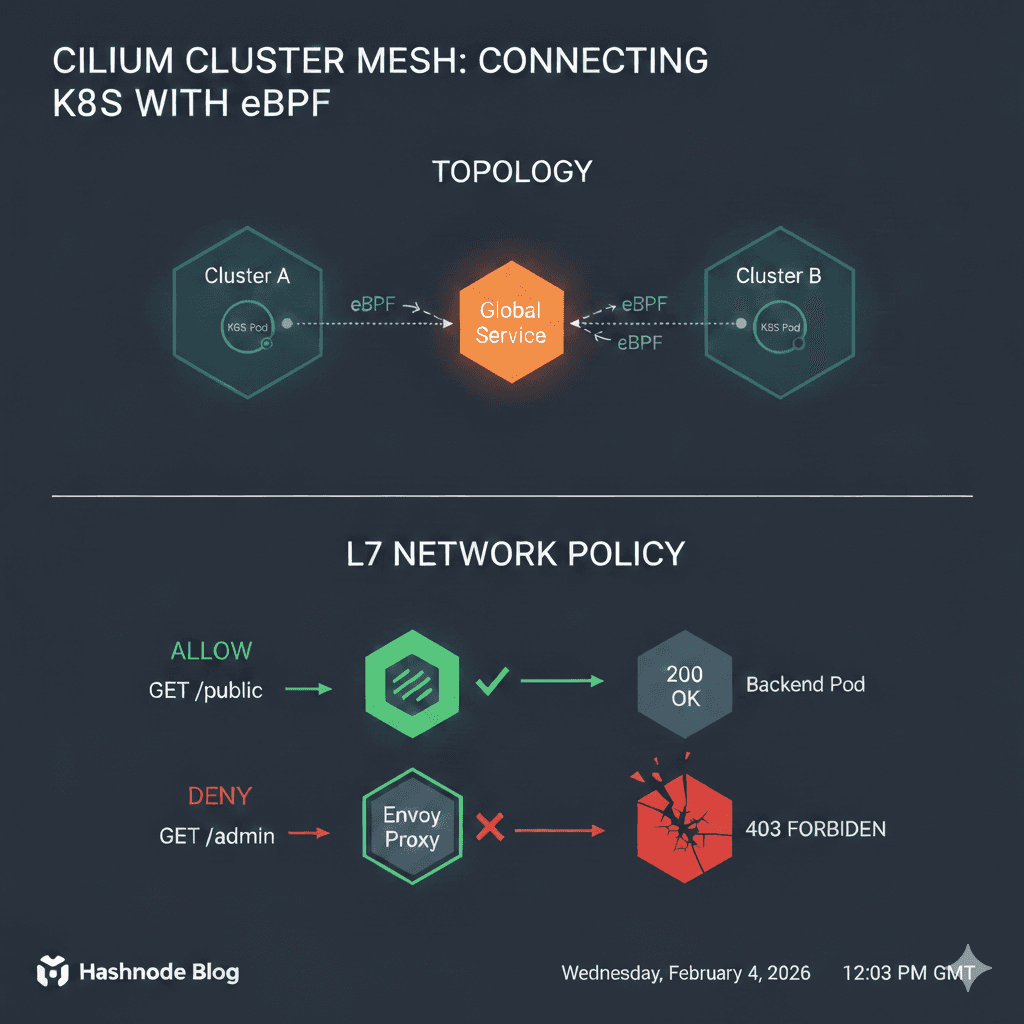
Cilium ClusterMesh Deep Dive: Connecting Kubernetes Clusters with eBPF
Infrastructure Engineer with a Linux SysAdmin and SRE & DevOps background, previously a Google Cloud authorised trainer, who's excited and enthusiastic about Kubernetes, IaC, CI/CD, DevOps and SRE!
Experienced project infrastructure lead, project technical lead, and former Google Cloud Authorized trainer. Guiding organisations on cloud adoption, DevOps and SRE implementation. Mentor to junior engineers and people looking to change careers from a non-technical background or looking to get back into tech.
I'm passionate about building and deploying Cloud native infrastructure, automation, driving change and empowering people in learning and development.
I’ve been slow with the blog posts, I’ve been very busy getting to grips with new tools, systems, ways of working, and just trying to learn as much as I can since starting my new role at a new company 6 months ago and not making my head explode… All good fun!
Anyway, Cilium is something I looked into when I was studying for the CKS: Certified Kubernetes Security Certification and we’re using it at my new place, so it seems like a good time to get better hands on with it.
Not an intro….. Introduction
Now this isn’t meant to be an intro to Cilium, I’ll just say it’s an open source project that provides networking, security and observability for container orchestrations, Kubernetes etc.
But yeah, pretty much it’s much more feature rich cluster networking than the standard networking CNI offerings but also improves security and works using a new Linux kernel technology called eBPF, which enables the dynamic insertion of powerful security, visibility, and networking control logic into the Linux kernel.
eBPF is used to provide high-performance networking, multi-cluster and multi-cloud capabilities, advanced load balancing, transparent encryption, extensive network security capabilities, transparent observability, and much more.
In other words, traditional CNIs rely on the Linux kernel’s iptables or IPVS (IP Virtual Server)to shuffle packets around using basic IP addresses; Cilium uses eBPF to bypass these bottlenecks entirely.
Definitely not an intro….. And this blog post is definitely longer than I intended it to be, you know how it is when you get in the zone!
So what am I actually doing with Cilium?
So I’m using Cilium to network 2 separate Kubernetes Clusters so I can loadbalance and failover requests for workloads between them, achieving “Multi Cloud” Kubernetes. I want to have my workloads spread across 2 separate clusters, potentially in 2 different cloud providers, with requests being able to respond locally or from the other cluster.
Anyway, back to networking 2 clusters together…. I’m using Kind to spin up 2 clusters on my homelab Docker host (my Mac Pro ProxMox is maxed out and my larger Dell PowerEdge ProxMox server, which has my prod and test 4 node Kubeadm clusters on, is having hardware issues…).
You don’t have to configure 2 workers if you don’t have the resources. (I had to trim mine down to 1 worker each towards the end…)
For Cilium ClusterMesh to work, your podSubnet must not overlap across clusters, so make sure to configure them to be unique CIDRs.
# My "GCP" Kind cluster gcp-cluster.yaml
kind: Cluster
apiVersion: kind.x-k8s.io/v1alpha4
name: gcp-cluster
networking:
  disableDefaultCNI: true
  podSubnet: "10.10.0.0/16" # Unique Pod Range
  serviceSubnet: "10.11.0.0/16"
nodes:
- role: control-plane
- role: worker
- role: worker

# My "AWS" Kind cluster aws-cluster.yaml
kind: Cluster
apiVersion: kind.x-k8s.io/v1alpha4
name: aws-cluster
networking:
  disableDefaultCNI: true
  podSubnet: "10.20.0.0/16" # Unique Pod Range
  serviceSubnet: "10.21.0.0/16"
nodes:
- role: control-plane
- role: worker
- role: worker
containerdConfigPatches:
- |
  [plugins."io.containerd.grpc.v1.cri".containerd.runtimes.runc.options]
    SystemdCgroup = true
Workaround… I had some issues running all these on one Docker host. When it came to adding the second cluster with 3 nodes, I was getting errors.
I0125 16:24:56.130526 233 round_trippers.go:560] GET https://aws-cluster-control-plane:6443/api/v1/nodes/aws-cluster-worker?timeout=10s 404 Not Found in 3 milliseconds
So after some digging around, I had to add the containerd runtime config in the AWS cluster nodes containerdConfigPatches yaml to use the systemd cgroup driver. It appears the nodes weren’t joining and the nesting of containers and resources on a single Docker host proved too much. By adding SystemdCgroup = true It prevents the "double management" of resources. Without this, both systemd and the container runtime try to manage the same processes.
On my Ubuntu Docker host server, I had to increase inotify limits. I’m guessing this is because we have a bunch of the same or similar applications or processes watching the same directories on the Docker host.
# Increase inotify limits (KIND's recommendation for multi-cluster)
sudo sysctl fs.inotify.max_user_watches=524288
sudo sysctl fs.inotify.max_user_instances=512
Kind often flakes out when running 4+ nodes on a single Linux host, so with these settings, we should be good to go!
Creating and preparing the clusters
Spin the clusters up kind create cluster --config gcp-cluster.yaml and kind create cluster --config aws-cluster.yaml
And you should hopefully get…..
$ kubectl cluster-info --context kind-gcp-cluster
Kubernetes control plane is running at https://127.0.0.1:39765
CoreDNS is running at https://127.0.0.1:39765/api/v1/namespaces/kube-system/services/kube-dns:dns/proxy

To further debug and diagnose cluster problems, use 'kubectl cluster-info dump'.

$ kubectl cluster-info --context kind-aws-cluster
Kubernetes control plane is running at https://127.0.0.1:41725
CoreDNS is running at https://127.0.0.1:41725/api/v1/namespaces/kube-system/services/kube-dns:dns/proxy

To further debug and diagnose cluster problems, use 'kubectl cluster-info dump'.
$ kubectl get nodes
NAME                        STATUS     ROLES           AGE     VERSION
aws-cluster-control-plane   NotReady   control-plane   2m45s   v1.32.2
aws-cluster-worker          NotReady   <none>          2m30s   v1.32.2
aws-cluster-worker2         NotReady   <none>          2m30s   v1.32.2
ferris@micro-ubuntu:~/Documents/kind_cilium_clusters$ kubectl get nodes --context kind-gcp-cluster
NAME                        STATUS     ROLES           AGE   VERSION
gcp-cluster-control-plane   NotReady   control-plane   28m   v1.32.2
gcp-cluster-worker          NotReady   <none>          28m   v1.32.2
gcp-cluster-worker2         NotReady   <none>          28m   v1.32.2
Now, if you've created a cluster before, you’ve seen this before… Don’t panic!
We configured the clusters without any CNI because we’re going to be using Cilium!
Installing Cilium
Using Helm, I’ll install Cilium:
helm repo add cilium https://helm.cilium.io/
helm repo update

# Install on GCP first
helm install cilium cilium/cilium --version 1.18.6 \
  --namespace kube-system \
  --set cluster.name=gcp-cluster \
  --set cluster.id=1 \
  --set ipam.mode=kubernetes \
  --set operator.replicas=1 \
  --set kubeProxyReplacement=true \
  --set k8sServiceHost=$(kubectl get nodes --context kind-gcp-cluster -o jsonpath='{.items[0].status.addresses[?(@.type=="InternalIP")].address}') \
  --set k8sServicePort=6443 \
  --kube-context kind-gcp-cluster
When that’s done, we need to configure some certificate secrets for the second cluster. Cilium ClusterMesh won’t trust another Cilium node with different certificates from one cluster to another.
kubectl get secret -n kube-system cilium-ca -o yaml --context kind-gcp-cluster > cilium-ca.yaml

# Delete the context-specific metadata so we can apply it to AWS
sed -i '/resourceVersion/d;/uid/d;/creationTimestamp/d;/namespace/d' cilium-ca.yaml

# Apply it to AWS
kubectl apply -f cilium-ca.yaml -n kube-system --context kind-aws-cluster
I ran into a Helm issue when installing for the second AWS cluster:
Error: INSTALLATION FAILED: Unable to continue with install: Secret "cilium-ca" in namespace "kube-system" exists and cannot be imported into the current release: invalid ownership metadata; annotation validation error: missing key "meta.helm.sh/release-namespace": must be set to "kube-system"
Turns out it was a Helm "ownership" conflict. Because I manually applied the cilium-ca Secret using kubectlHelm is refusing to take control of it because it's missing the labels and annotations that say, "This belongs to the Cilium Helm Chart."
Since we want the Secret to be there (it's the shared key that makes the mesh work), we need to "adopt" it into Helm's management.
kubectl annotate secret cilium-ca -n kube-system \
  meta.helm.sh/release-name=cilium \
  meta.helm.sh/release-namespace=kube-system \
  --context kind-aws-cluster

secret/cilium-ca annotated

kubectl label secret cilium-ca -n kube-system \
  app.kubernetes.io/managed-by=Helm \
  --context kind-aws-cluster

secret/cilium-ca not labeled
So let’s try again:
helm install cilium cilium/cilium --version 1.18.6 \
  --namespace kube-system \
  --set cluster.name=aws-cluster \
  --set cluster.id=2 \
  --set ipam.mode=kubernetes \
  --set operator.replicas=1 \
  --set kubeProxyReplacement=true \
  --set k8sServiceHost=$(kubectl get nodes --context kind-aws-cluster -o jsonpath='{.items[0].status.addresses[?(@.type=="InternalIP")].address}') \
  --set k8sServicePort=6443 \
  --kube-context kind-aws-cluster
These configurations for Helm are essentially saying single replicas for the operator because this is Kind, it’s a small cluster, so we will replace the kubeproxy with Cilium by configuring with kubeProxyReplacement=true.
In a multi-cluster world, Cilium identifies every Pod using a combination of its Namespace, Labels, and a Cluster ID. If both clusters have the same ID, Cilium's eBPF maps will collide, and you'll get "IP already exists" or routing loop issues.
Traditional firewalls use IP addresses. Cilium uses Security Identities. When a packet leaves Cluster A, Cilium attaches a numerical identity to it. Cluster B checks its local BPF map for that ID, not the IP, to decide if the traffic is allowed. This is why the unique cluster.id is so important!
Make sure you install Cilium CLI (Probably should have done this first :shrug)
Enable cluster mesh on both clusters.
cilium clustermesh enable --context kind-gcp-cluster --service-type NodePort
cilium clustermesh enable --context kind-aws-cluster --service-type NodePort
Then connect them.
cilium clustermesh connect --context kind-gcp-cluster --destination-context kind-aws-cluster
And verify….
cilium clustermesh status --context kind-gcp-cluster
⚠️  Service type NodePort detected! Service may fail when nodes are removed from the cluster!
✅ Service "clustermesh-apiserver" of type "NodePort" found
✅ Cluster access information is available:
  - 172.18.0.2:32379
✅ Deployment clustermesh-apiserver is ready
ℹ️  KVStoreMesh is disabled

✅ All 3 nodes are connected to all clusters [min:1 / avg:1.0 / max:1]

🔌 Cluster Connections:
  - aws-cluster: 3/3 configured, 3/3 connected
Looking good!
Testing it out
Deploy a workload to cluster 1.
Something like the echoserver, so we can test later. Here’s a snippet of what I used; change it how and what you want.
kubectl --context kind-gcp-cluster create deployment backend --image=k8s.gcr.io/echoserver:1.10
kubectl --context kind-gcp-cluster scale deployment backend --replicas=2
And a workload to cluster 2.
kubectl --context kind-aws-cluster create deployment backend --image=k8s.gcr.io/echoserver:1.10
kubectl --context kind-aws-cluster scale deployment backend --replicas=2
Then we need the global service.
apiVersion: v1
kind: Service
metadata:
  name: backend
  annotations:
    service.cilium.io/global: "true"
spec:
  ports:
  - port: 80
    targetPort: 8080
  selector:
    app: backend
Global Services must exist in both clusters with the exact same name/namespace for the mesh to "link" them. Apply to both clusters, then we test the functionality:
Deploy a tester pod to cluster 1.
kubectl --context kind-gcp-cluster run tester --image=alpine --restart=Never -- /bin/sh -c "apk add curl && sleep 3600"
Then we curl the service from the tester pod and see what and where the responses are:
kubectl --context kind-gcp-cluster exec tester -- sh -c "for i in \$(seq 1 10); do curl -s backend | grep 'Hostname'; done"
Hostname: backend-5974d998f8-47ddk
Hostname: backend-5974d998f8-bd5wg
Hostname: backend-5974d998f8-7brr9
Hostname: backend-5974d998f8-fcrcw
Hostname: backend-5974d998f8-47ddk
Hostname: backend-5974d998f8-fcrcw
Hostname: backend-5974d998f8-7brr9
Hostname: backend-5974d998f8-7brr9
Hostname: backend-5974d998f8-7brr9
Hostname: backend-5974d998f8-fcrcw

kubectl --context kind-gcp-cluster get pods
NAME                       READY   STATUS    RESTARTS   AGE
backend-5974d998f8-47ddk   1/1     Running   0          6m27s
backend-5974d998f8-7brr9   1/1     Running   0          6m27s
tester                     1/1     Running   0          43s
kubectl --context kind-aws-cluster get pods
NAME                       READY   STATUS    RESTARTS   AGE
backend-5974d998f8-bd5wg   1/1     Running   0          6m30s
backend-5974d998f8-fcrcw   1/1     Running   0          6m29s
We see results from backend pods from both clusters.
To make this clearer, I edited my deployments to include the cluster type/name in the pod’s name to make it more obvious
kubectl --context kind-gcp-cluster exec tester -- sh -c "for i in \$(seq 1 20); do curl -s backend | grep 'Hostname'; done"
Hostname: aws-backend-5c69d5f85-vxwx9
Hostname: aws-backend-5c69d5f85-vxwx9
Hostname: aws-backend-5c69d5f85-7f68c
Hostname: gcp-backend-57d9f789dd-hmqs6
Hostname: gcp-backend-57d9f789dd-hmqs6
Hostname: gcp-backend-57d9f789dd-hmqs6
Hostname: gcp-backend-57d9f789dd-dbbsp
Hostname: gcp-backend-57d9f789dd-dbbsp
Hostname: gcp-backend-57d9f789dd-dbbsp
Hostname: aws-backend-5c69d5f85-7f68c
Hostname: aws-backend-5c69d5f85-7f68c
Hostname: aws-backend-5c69d5f85-7f68c
Hostname: gcp-backend-57d9f789dd-dbbsp
Hostname: gcp-backend-57d9f789dd-hmqs6
Hostname: gcp-backend-57d9f789dd-hmqs6
Hostname: gcp-backend-57d9f789dd-dbbsp
Hostname: aws-backend-5c69d5f85-7f68c
Hostname: aws-backend-5c69d5f85-vxwx9
Hostname: gcp-backend-57d9f789dd-dbbsp
Hostname: aws-backend-5c69d5f85-vxwx9

kubectl --context kind-gcp-cluster get pods
NAME                           READY   STATUS    RESTARTS   AGE
gcp-backend-57d9f789dd-dbbsp   1/1     Running   0          4m47s
gcp-backend-57d9f789dd-hmqs6   1/1     Running   0          4m47s
tester                         1/1     Running   0          2m59s
kubectl --context kind-aws-cluster get pods
NAME                          READY   STATUS    RESTARTS   AGE
aws-backend-5c69d5f85-7f68c   1/1     Running   0          5m9s
aws-backend-5c69d5f85-vxwx9   1/1     Running   0          5m9s
We created the service with an annotation service.cilium.io/global: "true" This can be configured for other behaviours. Here are some examples and use cases I found interesting:
| Annotation | Use Case | Result |
service.cilium.io/global: "true" | Basic Mesh | Balanced traffic across all clusters. |
service.cilium.io/affinity: "local" | Cost/Latency | Stay in the local cluster. Failover to remote only if local is down. |
service.cilium.io/affinity: "remote" | Maintenance | Send all traffic to the other cluster (great for blue/green cluster upgrades). |
service.cilium.io/shared: "false" | Isolation | This cluster's pods are "hidden" from the rest of the mesh. Not advertised to the other cluster at all. |
I’ll add the affinity local annotation to my service that I added to both clusters earlier and reapply it to both clusters again to reconfigure:
apiVersion: v1
kind: Service
metadata:
  name: backend
  annotations:
    service.cilium.io/affinity: "local" ## Failover if the local pods are down/unavailable
    service.cilium.io/global: "true"
spec:
  ports:
  - port: 80
    targetPort: 8080
  selector:
    app: backend
kubectl exec tester --context kind-gcp-cluster -- sh -c "for i in \$(seq 1 5); do curl -s backend | grep 'Hostname'; done"

Hostname: gcp-backend-57d9f789dd-8nwss
Hostname: gcp-backend-57d9f789dd-s7kp5
Hostname: gcp-backend-57d9f789dd-8nwss
Hostname: gcp-backend-57d9f789dd-s7kp5
Hostname: gcp-backend-57d9f789dd-8nwss
The responses are staying local to the cluster as preferred, configured with the service annotation.
If I simulate an outage on the gcp-cluster and run the tester pod again, which is on the gcp-cluster:
kubectl --context kind-gcp-cluster scale deployment gcp-backend --replicas 0
deployment.apps/gcp-backend scaled

kubectl --context kind-gcp-cluster get pods
NAME     READY   STATUS    RESTARTS   AGE
tester   1/1     Running   0          56s

kubectl exec tester --context kind-gcp-cluster -- sh -c "for i in \$(seq 1 5); do curl -s backend | grep 'Hostname'; done"
Hostname: aws-backend-5c69d5f85-vxwx9
Hostname: aws-backend-5c69d5f85-7f68c
Hostname: aws-backend-5c69d5f85-vxwx9
Hostname: aws-backend-5c69d5f85-7f68c
Hostname: aws-backend-5c69d5f85-vxwx9

# Once again for good measure!
kubectl exec tester --context kind-gcp-cluster -- sh -c "for i in \$(seq 1 5); do curl -s backend | grep 'Hostname'; done"
Hostname: aws-backend-5c69d5f85-7f68c
Hostname: aws-backend-5c69d5f85-vxwx9
Hostname: aws-backend-5c69d5f85-7f68c
Hostname: aws-backend-5c69d5f85-vxwx9
Hostname: aws-backend-5c69d5f85-7f68c
Then bring it back up the gcp-backend pods and back in action.
kubectl --context kind-gcp-cluster scale deployment gcp-backend --replicas 2
deployment.apps/gcp-backend scaled

kubectl --context kind-gcp-cluster get pods
NAME                           READY   STATUS    RESTARTS   AGE
gcp-backend-57d9f789dd-49x4p   1/1     Running   0          4s
gcp-backend-57d9f789dd-9dhvg   1/1     Running   0          4s
tester                         1/1     Running   0          2m46s

kubectl exec tester --context kind-gcp-cluster -- sh -c "for i in \$(seq 1 5); do curl -s backend | grep 'Hostname'; done"
Hostname: gcp-backend-57d9f789dd-49x4p
Hostname: gcp-backend-57d9f789dd-49x4p
Hostname: gcp-backend-57d9f789dd-9dhvg
Hostname: gcp-backend-57d9f789dd-49x4p
Hostname: gcp-backend-57d9f789dd-49x4p
We’ve just configured and tested Kubernetes cluster failover!
Observability with Hubble
To see what’s going on with Cilium, we can use Hubble.
You can enable Hubble with the Cilium CLI or with Helm.

Running an aws-tester pod and running a curl to its own aws-backend pods, seeing as it’s set to prefer local, and I have scaled down the gcp-backend pods. Give us more information on the traffic and requests:

Summary
So there you have it! Cilium is much more than an updated network policy controller or Kubernetes firewall configuration.
We installed Cilium on 2 Kind clusters and enabled ClusterMesh!
Bonus Round!

Enjoy this fine piece of AI generated bonus stage image. I was losing the will trying to prompt it to be more like the Street Fighter II bonus stage…
As a “Thank You” for reading this far (if indeed, you still are….) Here’s some b-b-bonus material!
We’re going to see the real advantage of Cilium network policy in action with ClusterMesh!
apiVersion: "cilium.io/v2"
kind: CiliumNetworkPolicy
metadata:
  name: "simple-path-blocker"
spec:
  endpointSelector:
    matchLabels:
      run: tester
  egress:
    - toEndpoints:
        - matchLabels:
            "k8s:io.kubernetes.pod.namespace": kube-system
            k8s-app: kube-dns
      toPorts:
        - ports:
            - port: "53"
              protocol: ANY
          rules:
            dns:
              - matchPattern: "*"
    - toEndpoints:
        - matchLabels:
            app: backend
      toPorts:
        - ports:
            - port: "80"
              protocol: TCP
            - port: "8080"
              protocol: TCP
          rules:
            http:
              - method: "GET"
                path: "/public.*"
curling the backend pods from the tester pod (This will work if the tester pod is running in either cluster, as both backend pod deployments are labelled app: backend):
kubectl exec tester --context kind-gcp-cluster --   curl -v http://backend/admin

  % Total    % Received % Xferd  Average Speed  Time    Time    Time   Current
                                 Dload  Upload  Total   Spent   Left   Speed
  0      0   0      0   0      0      0      0                              0* Host backend:80 was resolved.
* IPv6: (none)
* IPv4: 10.11.57.143
*   Trying 10.11.57.143:80...
* Established connection to backend (10.11.57.143 port 80) from 10.10.1.123 port 50356
* using HTTP/1.x
Access denied
> GET /admin HTTP/1.1
> Host: backend
> User-Agent: curl/8.18.0
> Accept: */*
>
* Request completely sent off
< HTTP/1.1 403 Forbidden
< content-length: 15
< content-type: text/plain
< date: Mon, 02 Feb 2026 21:33:07 GMT
< server: envoy
<
{ [15 bytes data]
100     15 100     15   0      0   1479      0                              0
* Connection #0 to host backend:80 left intact

kubectl exec tester --context kind-gcp-cluster --   curl -v http://backend/public

  % Total    % Received % Xferd  Average Speed  Time    Time    Time   Current
                                 Dload  Upload  Total   Spent   Left   Speed
  0      0   0      0   0      0      0      0                              0* Host backend:80 was resolved.
* IPv6: (none)
* IPv4: 10.11.57.143
*   Trying 10.11.57.143:80...


Hostname: gcp-backend-57d9f789dd-4jcng

Pod Information:
    -no pod information available-

Server values:
    server_version=nginx: 1.13.3 - lua: 10008

Request Information:
    client_address=10.10.1.134
    method=GET
    real path=/public
    query=
    request_version=1.1
    request_scheme=http
    request_uri=http://backend:8080/public

Request Headers:
    accept=*/*
    host=backend
    user-agent=curl/8.18.0
    x-envoy-expected-rq-timeout-ms=3600000
    x-envoy-internal=true
    x-forwarded-proto=http
    x-request-id=f42e5b24-41aa-4da5-a755-023ddcfdb7d9

Request Body:
    -no body in request-

* Established connection to backend (10.11.57.143 port 80) from 10.10.1.123 port 39048
* using HTTP/1.x
> GET /public HTTP/1.1
> Host: backend
> User-Agent: curl/8.18.0
> Accept: */*
>
* Request completely sent off
< HTTP/1.1 200 OK
< date: Mon, 02 Feb 2026 21:33:13 GMT
< content-type: text/plain
< server: envoy
< x-envoy-upstream-service-time: 1
< transfer-encoding: chunked
<
{ [577 bytes data]
100    565   0    565   0      0  18802      0                              0
* Connection #0 to host backend:80 left intact

So to summarise what happened here:
Evidence of the Proxy: In both outputs, from curling the backend
/adminand/publicWe can see< server: envoy. This proves that traffic is no longer just "flowing" through the network; it is being actively intercepted and inspected by the Cilium-managed Envoy proxy.The "Secret" Headers: Notice the
x-envoy-internal: trueandx-request-idheaders in the/publicoutput. These are injected by the proxy and are great visual aids to show that "the network is now intelligent." Or more intelligent at least….The L7 Block: In the
/adminrequest, we can seeAccess deniedfollowed by the403 Forbidden. Because the "server" is stillenvoyIt proves the block happened at the Network Policy level, not because the application itself rejected you.
How Cilium L7 network policies work
With the typical regular Kube network policy, it’s quite broad; it’s either ports 80 and 8080 that are open to the labels we configure. With the Cilium network policy, we can define those ports that are available, but we can also configure a particular operation to a URL path. /public and the implied deny takes care of requests to /admin.
Cilium uses eBPF to intercept the packet at the virtual Ethernet interface. Cilium then identifies the source as run: tester and the destination as app: backend based on security identities rather than just IP addresses.
Cilium’s eBPF sees that an L7 HTTP policy is configured and active for this destination. Instead of forwarding the packet to the network, eBPF redirects the traffic to a local Envoy proxy listener on the node. This is transparent Injection, meaning we don’t have to make any changes to our client applications.
Envoy terminates the TCP connection, parses the HTTP headers and checks the requested path e.g. /public and /admin as we tried, against the configured and active CiliumNetworkPolicy.
What we then see is Success with /public. Envoy sees /public is whitelisted, initiates a new connection to the backend pod on port 8080 and injects those "secret" headers like x-request-id.
And we see a Block on /admin Envoy sees /admin is NOT whitelisted. It immediately generates an HTTP 403 Forbidden response with the server: envoy header and sends it back to the tester pod.
By using eBPF to transparently redirect traffic to Envoy, Cilium gives us 'Service Mesh' capabilities, like fine-grained HTTP control—without the overhead of managing sidecar containers in every pod.
I promise this is actually the end now…
Again, thank you for reading and following along, if indeed, you still are!
I’d been meaning to do a deeper dive into Cilum and find trying something as interesting as a multi cluster mesh more interesting than “Pod 1 can or can’t talk to pods 2 and 3….“ And writing about topics like this really motivates me to learn this fundamentally (What’s more motivating than not looking publicly stupid).
That being said, I am open to any comments, questions or a heads-up if I have missed anything, gotten the wrong end of the stick on something, something doesn’t work or what I should look at next!
Disclaimer (Can you tell I was a consultant!)
I’ve tried to be as accurate and factual as I can with Cilium and Kubernetes, etc. I am learning this and writing guides, hows to’s etc helps me grasp the “why” on new topics!
To be transparent, I used AI to help me troubleshoot and peer review some parts. I have fact checked and actually tested all this code and config.
This is by no means production ready (It’s literally Kind on a micro PC!) Your mileage may vary! Don’t go exposing your server, workloads etc to the internet.
Links to helpful documentation
Kind troubleshooting and common errors
Cilium Getting Started with the Star Wars Demo (A great demo for an introduction to Cilium network policies)